Website integration
Put the assistant where students already are
A key belongs to one bot. The install snippet puts that bot on your site. Check the real page before you trust it, including the routes where a chat would get in a student’s way.
- Where to go
- Bot Configuration → API Setup
- Who can do this
- Organization members managing the selected bot’s website integration
Generate a bot-specific website key
- 1
Open API Setup
Confirm the organization, and that the bot you mean already exists. The page title is API & Integrations.
- 2
Choose Generate API Key
Give it a label your team will recognise later, such as Institute website — production, and choose the bot. The label is for you. Students never see it.
- 3
Copy the key immediately
The full key is shown once. Save it in the place your website build expects before you close the dialog. We do not show it again, so a lost key is replaced, not recovered.
- 4
Record its purpose
Note which site uses which bot and key. The list of active keys shows labels and bot names, not the key itself.
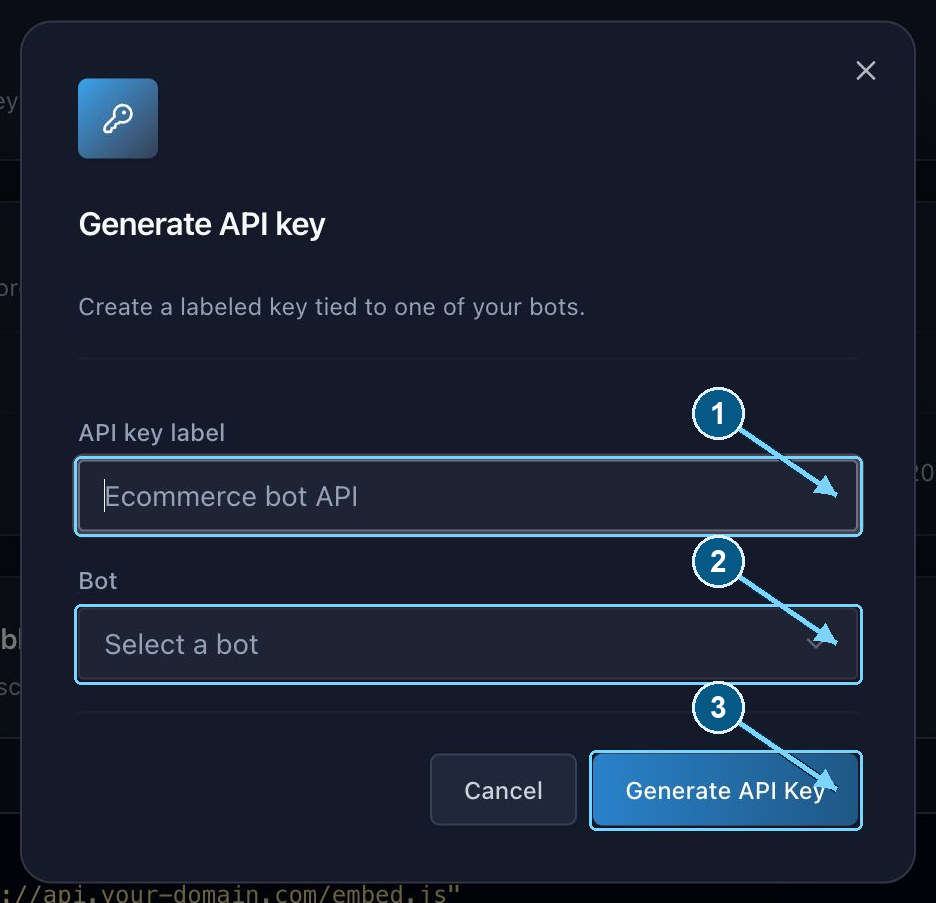
Choose the bot deliberately. A key belongs to one bot in one organization.
Enlarge- Name the website integration
- Select the correct bot
- Save the key when it is shown
Copy the automatic website installation
In Bot Configuration → API Setup, open Embeddable code. Enter the published widget script address, choose light or dark for the widget, and paste the key for your bot. Copy embed code appears once those values are filled in.
Paste that script once, in the head of the site. It starts itself after the page body is ready. React, styles, images, and audio are already inside it. A plain HTML site does not need extra React tags or a stylesheet link.
The script address must be your published chat-widget-ui.iife.js. A person who deploys the dashboard can set NEXT_PUBLIC_WIDGET_SCRIPT_URL so this field is filled in for you. The widget build must point at the deployed dashboard and chat server. A public site must not use a bundle that was built against localhost.
The theme you pick is written to data-theme. It accepts light or dark, and defaults to light if you leave it out. It is separate from the dashboard’s own theme. Only data-api-key is required. The dashboard finds the bot from that active key. You do not add a bot id, and the widget does not carry a default key.
<script
  src="YOUR_PUBLISHED_WIDGET_SCRIPT_URL"
  data-api-key="YOUR_BOT_WIDGET_KEY"
  data-theme="light"
  async
></script>Initialize from JavaScript instead
If you would rather start the widget from your own JavaScript, load the same published bundle without data-api-key, then call window.injectChat({ api_key, theme }) after the script has loaded. The onload example below keeps that order, including when the tag sits in the head.
window.chatInject is the older name for the same function, so existing installs keep working. Only api_key is required. theme is light or dark, and defaults to light. Calling the function again replaces the widget that is already there. The handle it returns has destroy(), if you need to take it off the page.
<script
  src="YOUR_PUBLISHED_WIDGET_SCRIPT_URL"
  async
  onload="window.injectChat({api_key: 'YOUR_BOT_WIDGET_KEY', theme: 'dark'})"
></script>
Choose which website routes show the widget
Open Bot Configuration → Interactions → Widget visibility. Choose On all routes, Only on these routes, or On all routes except these. Bots you already have default to every route. For either limited mode, enter at least one path, one per line, up to 50.
/pricing matches that page. /products/* matches /products and pages under it, but not /products-old. /* matches every path. Matching cares about case and ignores a trailing slash, a query string, and a fragment. Write paths without a domain. A hash is not its own route.
The widget asks for its settings before it shows the chat. A page that is not allowed does not mount the chat or start a session. If those settings cannot be fetched, the widget stays hidden and tries again. Saved rules refresh when the page loads, the route changes, you return to the tab, the network reconnects, and every 30 seconds while the page is visible. Exact paths, pushState, replaceState, and the browser’s back and forward buttons are included. A brief network failure leaves an existing chat in place. A revoked key, or visibility settings that are not valid, hides it.
Reload the website after you save new rules. The widget fetches its configuration once per install. These rules decide where the chat is shown. They are not a login system.
Check the actual website
- 1
Open a fresh website session
Use the real production or staging address. Confirm the launcher is there and the chat opens.
- 2
Confirm identity
Read the institute, the bot’s name, the avatar, the theme, the team, the hours, the email action, and the help link. This is the first impression a student gets.
- 3
Verify interaction
Ask a question you know the answer to, complete the contact form if you use one, and find the enquiry in the dashboard. Test chats spend reply allowance.
- 4
Verify support
Ask for a counsellor while a teammate watches the dashboard. Try an attachment under 5 MB.
- 5
Check mobile
On a small screen, the launcher, the form, the message box, and close should be usable, and they should not cover the controls the website itself needs.
Rotate and revoke keys carefully
The trash icon on an active key revokes it. A site still using that key cannot start a new authenticated chat with it. A chat that is already open is a separate matter. Do not promise that every open window disappears at the same second.
If you closed the dialog before saving the key, generate another one. The list cannot show the old key again. Update the website and check it before you revoke a key that is still working.
A widget key is meant to live in the website. It is not a dashboard login, and it is not a secret for an AI provider. Never put a provider secret, a signing key, or a staff token in the embed.