Resources
Offer a document when it would actually help
Some files are for reading together, not for memorising. Describe when a brochure or checklist would help, let the assistant offer it, and share it only when the student says yes.
- Where to go
- Bot Configuration → Bot Resources
- Who can do this
- Members of the organization managing the selected bot
The conversation reveals the right moment
Students often do not know the name of the document they need. The assistant looks at the titles, descriptions, and categories of active resources and offers one when the conversation calls for it.
Someone asking what to prepare before applying might hear the answer, then “Would you like the admissions checklist?” The assistant asks before attaching a file they did not request. If they ask for the file directly, it can share it straight away.
A short “Yes, please” accepts the offer that just appeared. The matching download or link arrives as one small card. “No” means no. The assistant should keep helping without bringing that file up again. Each resource appears at most once in a reply.
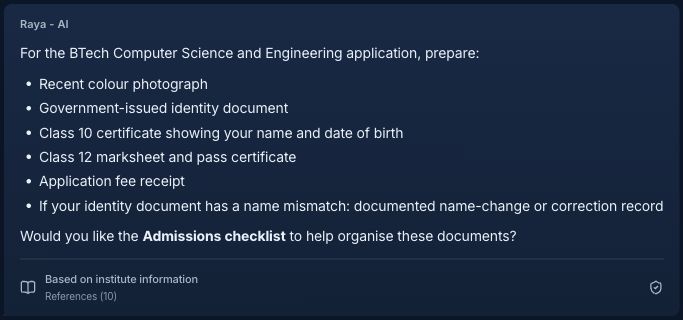
A real test conversation using sample institute data: the student asks about applying, and the bot offers a relevant checklist before sharing it.
EnlargeOne confirmation, one useful resource
The student can accept in ordinary language. They do not have to repeat the title. The assistant uses the conversation to know which offer they mean. If “yes” could answer more than one question, it should ask which one.
A file card shows a small type icon, the title, and a download. A link card opens in a new tab. Download links are refreshed when history comes back. A paused or deleted resource is left out of future replies. The guidance you wrote for the team never appears on the card.
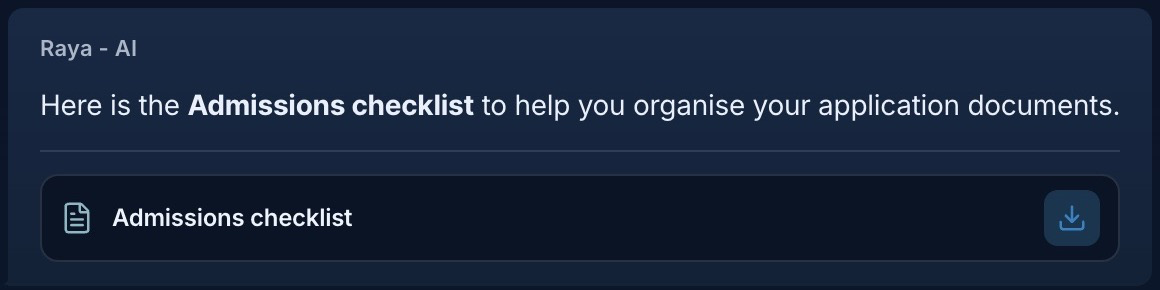
After “Yes, please,” the visitor receives the title and download icon. Internal sharing guidance is never displayed on the card.
EnlargeAdd a file or a link
- 1
Choose the correct bot
Open Bot Resources and select the bot that should offer this. A checklist for one campus should not appear in another bot’s chat.
- 2
Choose File or Link
Select Add resource. Upload a document or image you are happy for a student to keep, or paste an HTTP or HTTPS address.
- 3
Give it a visitor-friendly title
“Admissions checklist” is clearer than an internal filename. A category such as Admissions helps you, and the assistant, group similar help.
- 4
Explain when it helps
In “When should the bot share this?”, describe who it is for and the moment it becomes useful. This is how the assistant decides to offer it, rather than guessing from the filename.
- 5
Save and test
In a fresh chat, talk about the topic without asking for a download. Accept the offer and open the card. If the file is the wrong year, a student will trust it anyway.
Write descriptions that describe the student’s need
A useful description names the moment, not just the file. Example: “A checklist of documents for applicants to all undergraduate courses. Offer this when a student asks what to prepare before applying.”
For a brochure, name the course, campus, and intake. For an application link, say who should use it and when. Clear guidance helps the assistant choose between similar files. It does not let a resource wander outside the bot’s admissions purpose.
The description and category stay with your team. Students see the title and a download or link icon. Write the title for them.
Sharing a file is not the same as teaching its contents. If the assistant should also answer questions from the document, add it in Training Data as well.
Edit, pause or remove a resource
- 1
Open the resource menu
Use the three-dot menu on the row and select Edit resource.
- 2
Update the guidance
Change the title, description, or category. For a link, you can also change the address. Save. The next turn of an open chat uses what you just saved.
- 3
Pause sharing when needed
Pause when a file should not be offered or downloaded for now. Pausing keeps the file and still uses a slot. Use it when the content is being checked, not when you want the space back.
- 4
Remove an obsolete resource
Delete it when students should no longer receive it. Deleting a file frees its slot and its storage. Keep your own copy of the original.
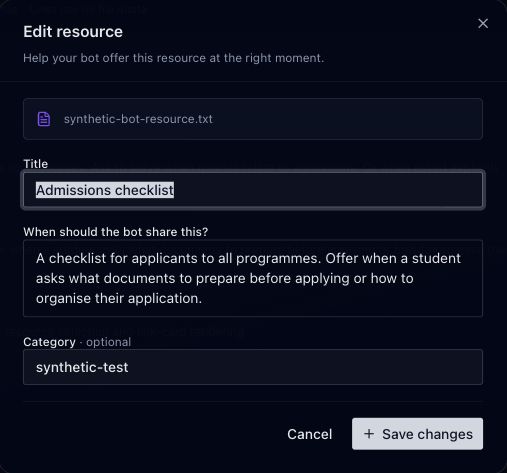
Edit the guidance in place; no new upload is needed to change the title or description.
EnlargeFile quotas, with unlimited resource links
A training file uses one training-source slot and one shared file slot. A training page uses a source slot only. A resource file uses a shared file slot only. There is no private pile of resource files. They use whatever capacity the organization has left.
Training files, resource files, and files a visitor attaches all share the organization’s upload count and storage, across every bot. Links do not. Training pages keep their own source allowance.
An upload that is still in progress reserves space. Pausing a resource does not free a slot. Deleting its file does. Files you already have stay available if a new plan is smaller, but the next upload has to fit.
The Resources page shows what you have used and what is left. If something cannot be saved, the message says whether the file count is full, storage is short, or the file itself is too big. You can still add a link when file capacity is full.
| Allowance | Trial | Starter | Growth |
|---|---|---|---|
| Uploaded files — shared count | 5 | 20 | 100 |
| Training sources — separate allowance | 5 | 20 | 100 |
| File storage — shared total | 20 MB | 100 MB | 500 MB |
| Maximum per file | 10 MB | 10 MB | 25 MB |