Configuration
Tell the truth about who is answering
These fields are the assistant’s introduction and the promise you make about human help. Write them the way you would speak to a student: clear, specific, and no more confident than your team can be.
- Where to go
- Bot Configuration → Interactions → select a bot
- Who can do this
- Members working with a bot in the selected organization
Identity and tone
| Field | Meaning and guidance |
|---|---|
| Bot Name | Required, 3–50 characters. The name a student sees, such as Admissions Assistant. Choose a name that sounds like help, not a campaign. |
| Institute Name | The institution represented in the widget. Use the public name consistently; validation expects 3–75 characters. |
| Bot avatar image URL | Optional square image over HTTPS. Use a stable direct image URL you control. If it cannot load, the widget uses its default avatar. |
| Tone | Friendly, Professional, Enthusiastic, Casual, Concise, Empathetic, Humorous, Authoritative, Formal, or Neutral. Professional or Friendly is a sound place to start. Warmth should never outrun accuracy. |
| Role of the Bot | Customer Support, Sales, Marketing, Technical Support, or Other. This shapes how the assistant speaks. It does not give anyone extra access. For admissions, pick the persona that matches guidance rather than pressure. |
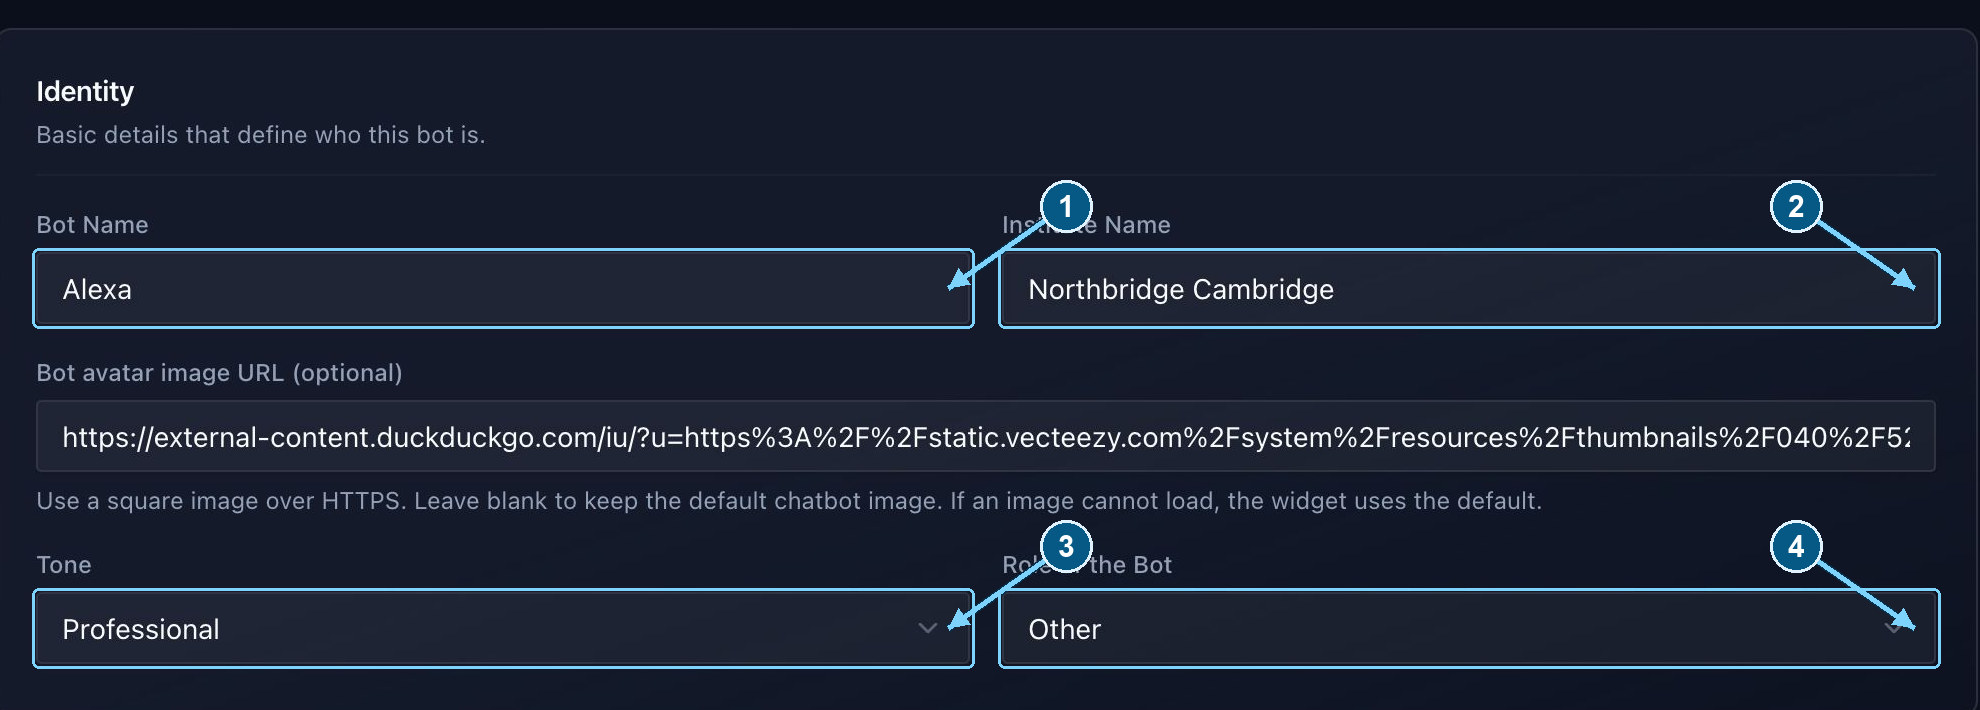
These settings describe the assistant. They do not change a teammate’s permissions.
Enlarge- Visitor-facing bot name
- Institute identity
- Conversation tone
- Bot persona, not team role
Widget header and support settings
| Field | Meaning and guidance |
|---|---|
| Support email | Optional monitored address. The envelope in the widget opens the visitor’s email app with a prepared support message. It does not send email automatically. |
| Support team name | Optional label, up to 60 characters, such as Admissions Team. |
| Typical human reply time | Optional estimate from 1 to 10,080 whole minutes. Students see this number, so make it one your team can keep. It is not a live queue, and it does not change how long a handoff waits. |
| Human support hours & time zone | Choose the days someone is actually there, with opening and closing times and the right time zone. The widget shows the schedule. It does not put a person in the chair. |
| Help centre link | Optional HTTPS link to a real FAQ or help page. It opens separately from the conversation. Test the destination before launch. |

Set support hours in the team’s actual time zone. An estimate does not indicate live availability.
Enlarge- Visitor-facing email contact
- Name the team visitors will reach
- Choose a realistic reply estimate
Set support hours and verify the visitor header
Choose only the days your team is there, then check the opening time, closing time, and time zone in the widget. Students use this to decide whether to wait. The schedule describes when you aim to be available. It does not accept or refuse a handoff by the clock.
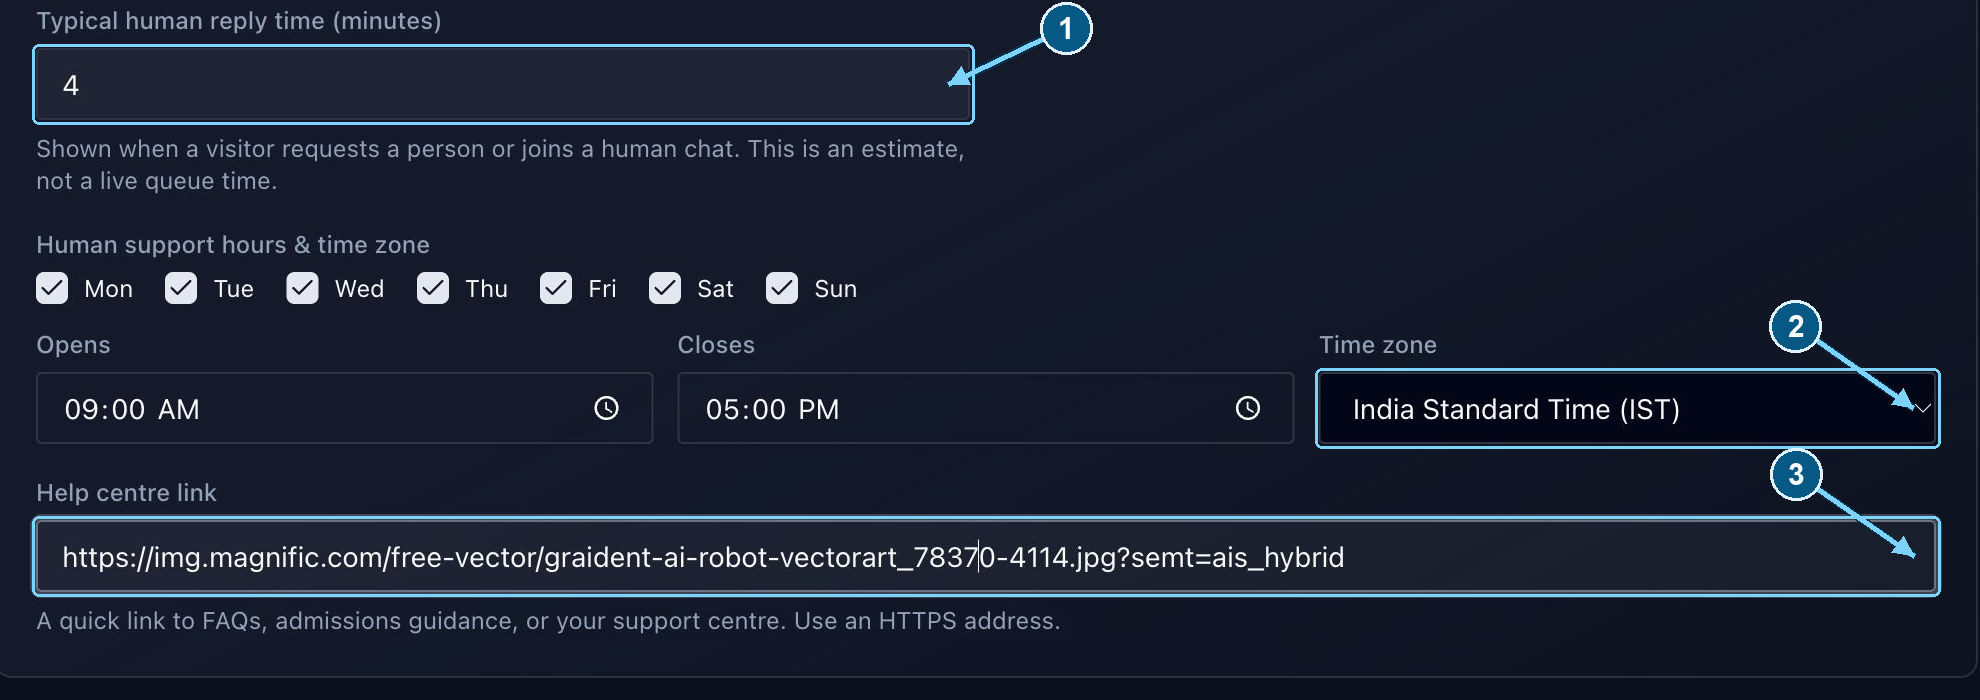
The time zone belongs to the support schedule. The reply estimate is separate from the handoff timeout.
Enlarge- Displayed estimate in minutes
- Time zone for support hours
- Public help destination
See where the settings appear to visitors
The email icon sits beside fullscreen and close. The team name, help link, reply estimate, and hours appear under the bot’s name. The paperclip starts an upload. The picture uses example settings. Before you launch, open your own email and help link the way a student would.
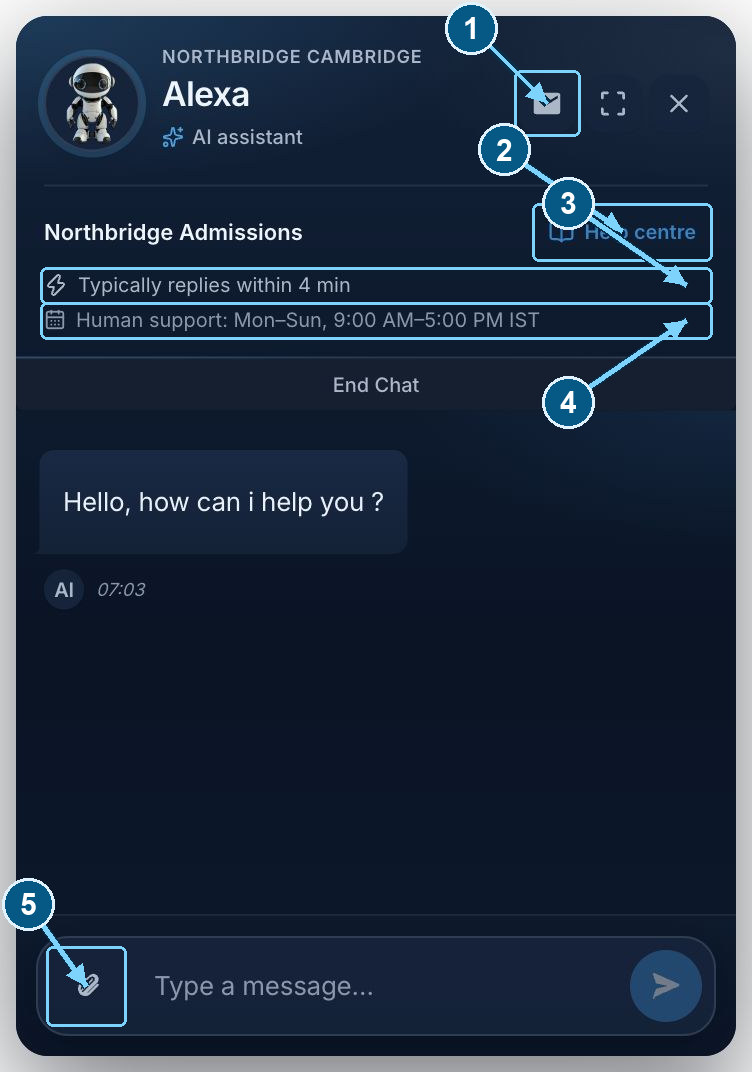
Use the header to reach support, open the help centre, and check service hours.
Enlarge- Open the visitor email app
- Open your help centre
- Check the reply estimate
- Check support hours and time zone
- Attach a file to the conversation
Greeting, contact request, and business context
| Field | Purpose and example |
|---|---|
| First Message | Required, 3–500 characters. Offer a real kind of help. Example: “Hello. I can help with programmes, eligibility, fees, and applications. What would you like to know?” |
| Lead Capture Message | Say why you are asking, and only ask for what the follow-up needs. Example: “Share your email so our admissions team can follow up on this enquiry.” The message should match the fields you turned on. |
| Confirmation Message | Thank them without inventing a callback time. Example: “Thanks. Your details are with the admissions team.” A kind sentence is not the follow-up itself. |
| Business Description | Required, at least 3 characters and no more than 600 words. Describe who you are, who you help, and when a person should step in. Keep changing facts — fees, dates, rules — in training sources, where you can replace them. |
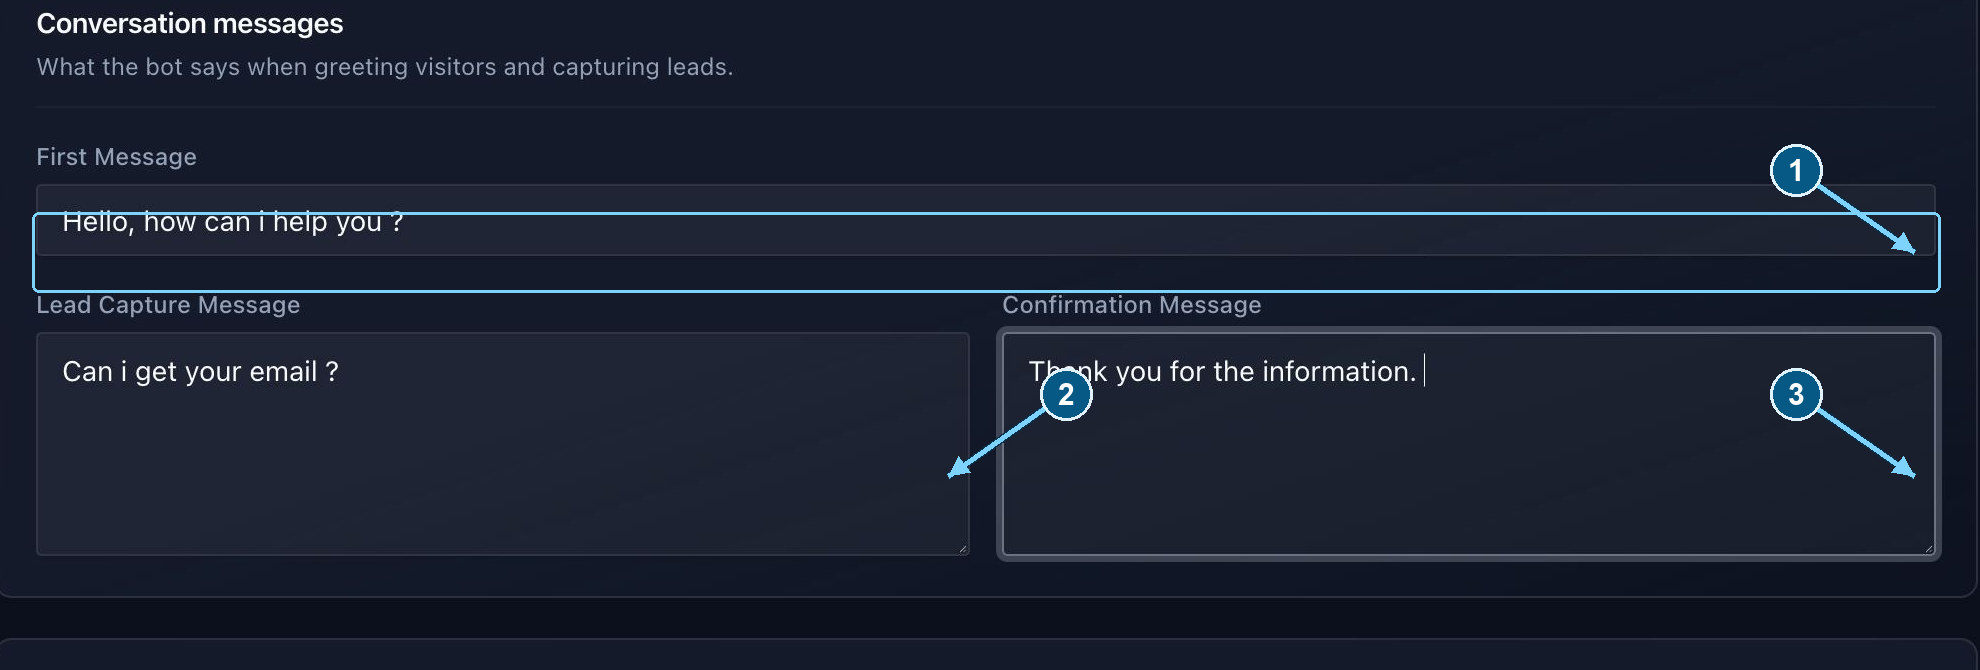
Write each message for its actual purpose and save after editing.
Enlarge- Opening greeting
- Explain why contact details are requested
- Acknowledge the captured details
Lead capture timing and fields
Turn Lead capture on to see when it asks and which fields it uses. The choices are Name, Email, and Phone Number. Ask only for what a follow-up truly needs. A student should know why you are collecting it.
Before starting the conversation shows the form first. After the first message lets them ask something before the form appears. Try the timing in a fresh chat after you save. An older chat can keep the previous setting.
While the form is open, the usual message box and paperclip are paused. That is intentional: finish the form, then continue the conversation.
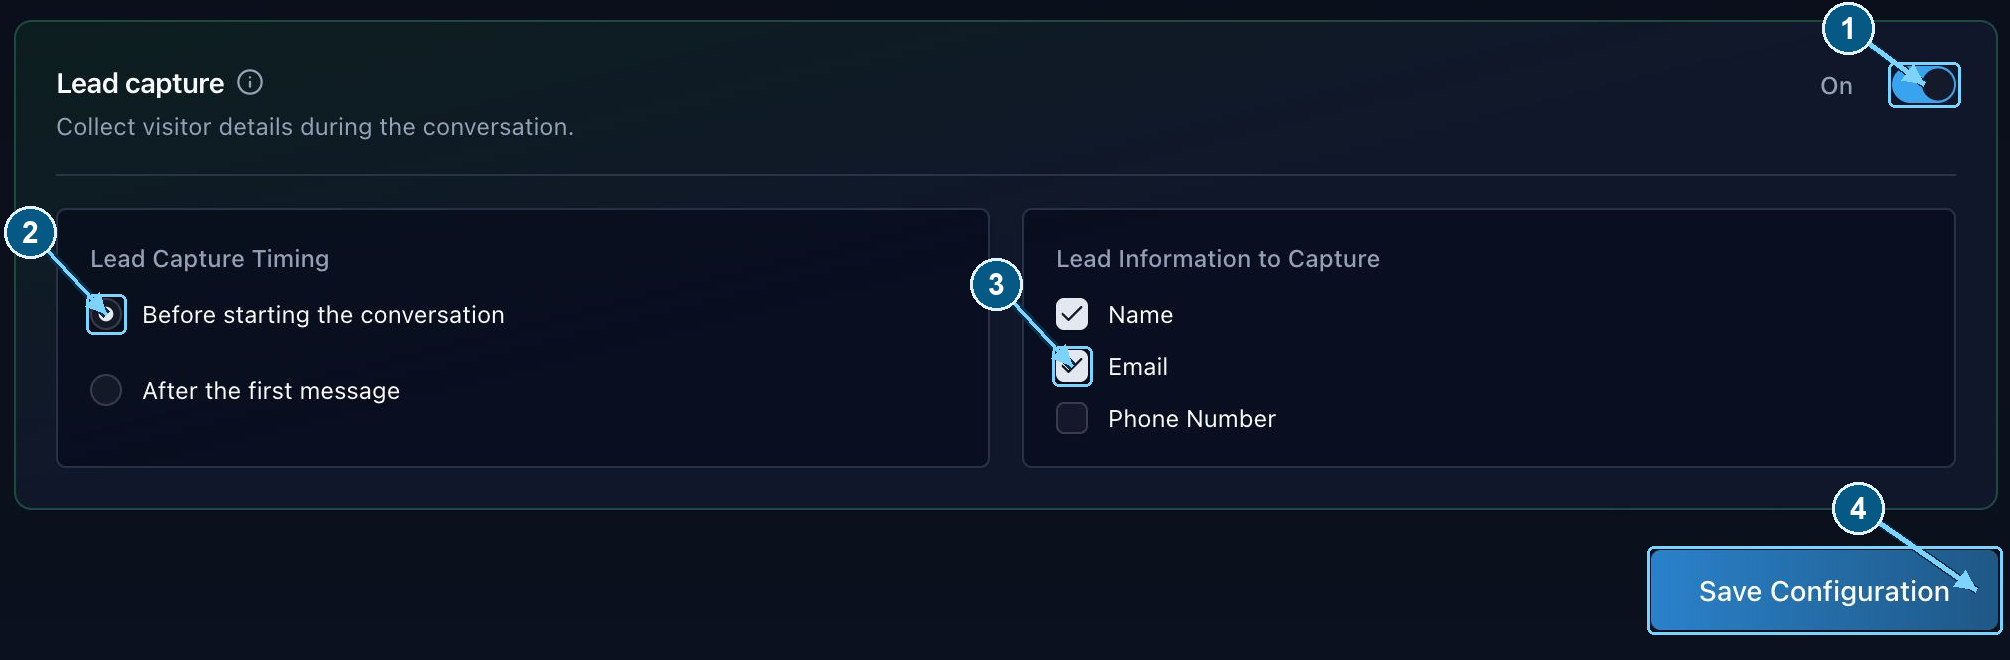
Choose the timing and contact fields, then save.
Enlarge- Enable contact capture
- Capture before chatting
- Choose the requested fields
- Save, then test a fresh session
Save and verify your changes
- 1
Save Configuration
Read any validation message before you leave. A grey placeholder is not a choice you have made.
- 2
Start a fresh visitor session
Read the name, greeting, support links, hours, and contact form the way a new student would.
- 3
Match the promise to the team
If the hours or reply estimate are more hopeful than the people you have, change the words. Honesty here builds more trust than a faster-looking number.